Content Migration. How to Move Your Content to a New Website?

Content migration is one of the elements of a noticeably bigger process – website migration. It’s crucial when it comes to SEO as the quality and quantity of the content on a given website determines the number of search queries to which your website will be displayed in the search engine. This in turn translates into traffic to the site and conversion rate, meaning for example sales in an online store. How to properly execute content migration? Keep reading our today’s entry!
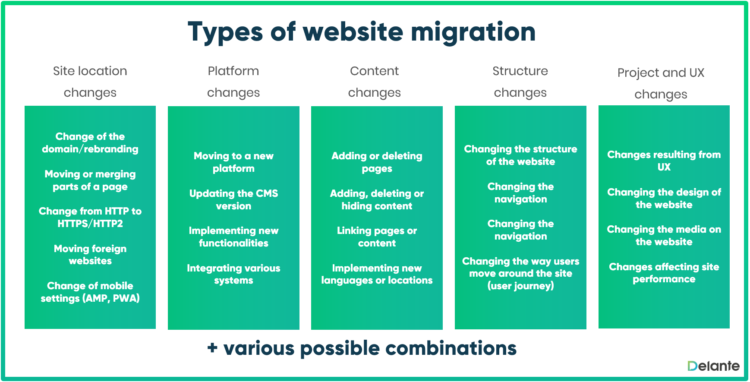
Website migration is a term eagerly used by SEO specialists to describe any activities that result in significant changes affecting the visibility of a given website in the search engine. Usually this process concerns changes in the location of the site, CMS, the structure of the website and even its content.
When it comes to website migration, it’s very important to make sure that during the process you don’t lose the content generating traffic to the website. You may consider some texts or photos outdated inadequate to the current profile of the site or you can simply think that they’re of little value. However, this may have a negative impact on the visibility of the site.
Basic steps for website migration
Let us briefly remind you what should be borne in mind when starting the website migration process:
- Why? – What is the reason for making the changes?
- To what extent? – What specifically needs to be changed? (it’s advisable to perform an in-depth and comprehensive audit of the website).
- Task division – both the SEO specialist and the webmaster will get their tasks to do. If you use the services of professional agencies you should definitely involve them into the process.
- Website backup – thanks to it if something goes terribly wrong you can restore the original version of the website.
- Test page – you’re designing a new website that can’t be indexed for the time being. Gradually you transfer and improve all elements from the previous version of the site.
- Verification of the test page – you need to check whether everything has been done properly – internal linking, copied content (category and product descriptions, blog entries but also title, meta description, headers and alternative descriptions).
- Test page backup – before introducing the changes you need to make a backup of the new version of the site.
- Let’s run a new service and…
Bravo!!!
– OR –
If something went wrong you can restore the old version of the website and keep testing its new version.
As we’ve already mentioned, the above description of website migration is very brief. If you want to read a comprehensive guide that explains how to execute the process safely step by step, go to: http://www.icrossing.com/uk/ideas/site-migration-checklist
Moving your content to a new site
Content migration concerns surprisingly… the whole content. However, it’s very important that you don’t understand content only as descriptions or blog entries – it’s much more that can’t be noticed at first glance:
- website titles,
- meta description,
- headers,
<strong>and<em>tags,- alternative descriptions of the graphics (including the graphics),
- anchor links (internal linking is the most important aspect when it comes to content migration),
- comments, opinions, reviews, etc.
During this process it may happen that you’ll decide to do some reorganization – you can divide the content from one subpage into several others, you can keep the subpages but completely change their content or you may expand your content. All such changes should be applied consciously.
Analyze the content you want to move
If you’ve answered the questions “Why do I need content migration and what do I want to achieve?”, you can start preparations. The content migration process doesn’t differ from the regular website migration, however, we want to draw attention to the elements that are crucial for the visibility of the website in the search engine. You’ve to analyze the content of your site. If the website isn’t big, a simple spreadsheet will be enough. When it comes to very complex websites, it’s advisable to use specialized tools such as Content Insight.
Don’t focus solely on analyzing the content, remember about backlinks and traffic. Check which keywords are matched to each subpage – if you had a problem with the cannibalization, then you may reorganize the content in order to solve the issue.
Outdated content – should it be moved?
Some of your content may be already very outdated but it doesn’t necessarily mean that you need to get rid of it. Products withdrawn from the offer can still attract potential customers when it comes to online shops. Although they won’t be able to buy this particular item there is a good chance that you’ll draw their attention to the “recommended products” or “check also” sections. If possible, try to update the old content. Alternatively, you may consider running an archive with outdated entries.
Can you delete subpages? Very rarely. If the subpage doesn’t have any backlinks, isn’t displayed for important key phrases and doesn’t generate any traffic, then it can be deleted. However, if at least one of the abovementioned conditions isn’t met, then you need to reconsider your decision. Theoretically, you can delete a subpage with backlinks and set the 301 redirect which transfers most of the link juice, nevertheless, it’s not 100% and a huge amount of such redirects really make a difference. Additionally, the users visiting the site may feel disappointed that instead of seeing the product they’re redirected to a category page. In such a situation they’ll probably go back to the search results and choose your competition. Therefore, you should delete your subpages only as a last resort. You can always mark a given product as “unavailable” or “withdrawn from the offer” and provide the users with other options.
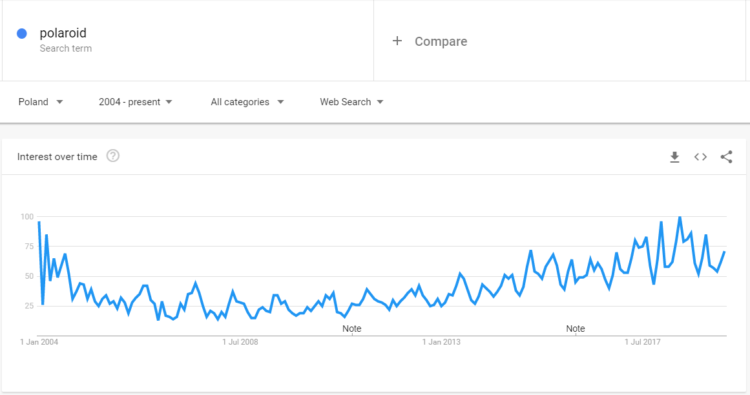
Analyzing the traffic will allow you to determine which subpages are the most important for your site. However, even those pages that don’t generate traffic may be valuable if they concern specialized issues. It’s worth keeping them if the topicality hasn’t decreased drastically. What the users are searching for is to some extent determined by the current trends which often make a come back every few years. In such a situation it’s worth moving the content to a new site. As an example we can take polaroids, cameras that print photos immediately after they’re taken – a decade ago they were considered a thing of the past.
What to pay attention to during the migration?
When you already know which content you want to move and which subpages will replace the deleted ones, then you can start transferring the content to a new page – the one that still isn’t indexed. The amount of work that needs to be made manually depends on whether you decide to change your CMS. Before starting the migration you should also check if the new system has all the necessary functionalities you need. This applies also to how the content of the website is displayed – if together with the migration you decide to change the layout of your site, then it may affect the comfort of the users or, to be more precise, its lack. If the content of a new website is to be shown in “a more spectacular way”, make sure that the search engine robots will be able to read it. In a situation when Search Console can’t be used for this purpose, go for Fetch & Render.
Remember to ensure that you’ve moved all the elements linked to the content, especially those that have impact on SEO:
1. Product and category descriptions, title, meta description, alts…
Make sure that all texts such as category and product descriptions have been moved properly. If you copy the content to a new CMS from a text editor (e.g. MS Word), use the paste option without formatting. At the same time it’s important to introduce Hx headers and other semantic tags (<strong> and <em>), as well as texts that aren’t visible on the website itself: page titles, meta descriptions or alternative descriptions of graphics and photos.
2. Internal linking
Internal linking may turn out to be quite problematic. In some CMSes (e.g. Shoper) URLs to subpages within a given domain are saved in the form of relative paths. If the new system requires absolute paths, then you’ll have to correct them manually:
<a href=”/category/subpage”>anchor</a>,
to:
<a href=”https://www.domain.pl/category/ subpage”>anchor</a>.
You need to go through all the links on the site, including:
- the navigation menu,
- the header and footer,
- the content of the website,
- pagination and canonical links,
- horizontal links (related articles, similar products, etc.),
- vertical links (e.g. breadcrumbs),
- links to other language versions of a given subpage (the hreflang tags also need to be checked).
3. The files on the website
It’s very important to move all the files that your website refers to and ensure that their addresses are correct. This includes not only graphics, other multimedia uploaded to the server (during the migration take care of friendly URLs, especially if they were previously capitalized or included the characters that aren’t recommended) and PDFs but also CSS style sheets and JavaScript libraries (including other languages). You’ll also need to prepare new robots.txt and sitemap.xml files.
4. XML maps
XML maps will play particularly crucial role in the correct migration process. On their basis you implement 301 redirects when starting a new website. With the use of web crawler tools (e.g. Screaming Frog) you may scan the website and get a list of URLs that can be accessed via internal links. Later you choose the ones that are worth using the redirects. From Google Analytics and Search Console you take the list of all subpages that have been visited by the users. Ahrefs or Majestic will help you to check which subpages are referred to in valuable external links.
5. 301 redirects
Then you put all the subpages collected this way into a spreadsheet, you delete the ones that are repeated, group the remaining sites and in the next column you assign them to analogical addresses to the new version of the page. If you’ve decided not to transfer all the subpages, then you redirect the deleted sites to other most thematically relevant subpages or categories. Setting such redirects to the homepage can generate soft 404 errors in Google Search Console.
Implementation and observation
After preparing all the content for the migration, you check whether all the elements have been properly implemented in the test version and later you can create its backup. Content migration implementation is done in exactly the same way as any other migration. When Google robots are allowed to visit the new version of the site you need to monitor whether the subpages from the new versions of the website are listed in Google Search Console. You also need to regularly check for the 4xx or 5xx errors.
It may take some time for the search engine robots to get to the new version of the website. However, you aren’t doomed to wait until the crawlers decide to visit your site. Use Google Search Console and add a new version of your site to be indexed. Obviously the bigger the site, the longer it’ll take Google robots to go through it.
Observe positions on which your website is displayed on various key phrases. In order to be able to compare your results achieved thanks to the changes, the observation should start even before the migration. You’ll need to wait even up to 2 months for reliable data – this is how long it may take Google to fully reindex your site and update the search results. Even though the whole process has been completed correctly, there might be some decreases in the first period after the migration. Fortunately, later the positions and traffic to the website will improve.


